CRAM Cannons
Overview
CRAM Cannons are a weapon system with shell sizes varying from 1,000mm to 2,000mm. Typically, they have a longer reload time with high damage shots. This weapon system is most effective against targets that cannot evade or destroy the incoming shell.
Components
Firing Piece The main block of a CRAM system. Barrels connect to the circular face, and other components connect to the remaining 5 sides. The firing piece has a default capacity of 250 at 1,000mm, and 1,000 capacity at 2,000mm. Has a default firing arc of 35 degrees in elevation and azimuth.
Gauge Increaser Increases the maximum gauge of a cram by 50mm per block. Gauge increasers give up to a 4x bonus at 2,000mm to the capacity of the Firing Piece and Compactors
Six Way Connector Connects cram components together. Has connections on all 6 sides.
Packer Connects Pellets/Compactors to a CRAM system. Packers add one Pellet per second to the CRAM shell per connected Pellet block. Pellets/Compactors connect to the packer on the three prongs. Packers connect to the CRAM system on the remaining three sides.
Pellets Can only connect to packers Determines the type of damage the weapon does. Notable for being the most expensive block on a cram (180 materials), Although Hardener pellets are slightly cheaper (150 materials) with reduced Firepower per Volume. Hardener Pellet AP is a linear ratio between the amount of hardener pellets and other pellets to a maximum of 40 AP.
Compactor Can only connect to packers Increases the maximum capacity of a cram by 12 per connection at 1,000mm, and 50 at 2,000mm when connected to a Packer
Barrels
Connects to the Firing Piece to increase accuracy
Barrel has double the accuracy bonus per length as other barrels
Heavy Barrel has double the accuracy bonus per length as other barrels. Features increased Armor and Health, with a barrel traverse speed penalty.
Motor Driven Barrel Increases the traverse speed of the barrel
Elevation Barrel (Up to 4 will have effects) Increases the maximum elevation of the barrel by 10 degrees per barrel up to 75 degrees. Decreases maximum azimuth by 10 degrees down to a minimum of 5 degrees per block.
Recoil Suppression Barrel Reduces Recoil impulse to the vehicle to 75% of the current recoil value, with a 5% reduction to current shell velocity.
Flash Suppression Barrel (only one can be used per firing piece) Halves the detection range of cram (396m -> 198m at 1,000mm, 792m -> 396m at 2,000mm).
Bomb Chute (For use by itself as one barrel) No recoil, sets accuracy to perfect, increases the max elevation and azimuth to 80 degrees, decreases the detection range (396m -> 79m at 1,000mm, 792m -> 158m at 2,000mm), fixes shell speed to 40m/s, changes Barrel Rotation speed to 280 degrees/second at 1,000mm, and 197.99 degrees/second at 2,000mm.
Additional blocks
These blocks add additional features to a CRAM cannon. All of these can be connected to 6 ways, Firing pieces, or Gauge Increasers
Fusing Box Allows the addition of fuses to a CRAM shell and allows for Tip Conversion. Tip Conversion allows for the use of the Hollow Point tip that converts kinetic damage into impact damage at 15 AP. Each fuse used adds a 10% reduction to shell health.
Laser Targetter Used to automatically set Timed Fuses and set altitude offsets for Altitude Fuses
Predictor Draws a line following the predicted shell path
Tetris
Cram Tetris is created in layers. There are several different types of layers and patterns that can be used. The two most common Tetris types are 2-D Tetris and 3-D Tetris. 2-D Tetris is a layer comprised of diamond shaped patterns of packers, 6-way connectors, and Pellets/Compactors. these layers can then be stacked on top of each other and connected with a connection layer for a complete Tetris. 3D Tetris is a variation of 2D Tetris that adds a new layer type to increase efficiency and density. This layer is called the 3-D layer. 3-D layers have a special pattern of 6-ways and packers that connect to the layers above, below, or both at the same time.
It is important to note that CRAM cannons can share Pellets and Compactors between several firing pieces, but no other blocks may be connected to another firing piece.
Pattern Types (Images Needed)
Diamond- Connector in the center, with 4 packers attached. Then, pellets/compactors are added to the packers creating the "Diamond" pattern. Repeat this pattern like a quilt until the desired space is filled.
Inverted Diamond- Same technique as Diamond Tetris, but you start with a pellet in the center. The pellets should initially make a shape resembling an X.
1 Axis Offset- Diamond Tetris shifted one block over
2 Axis offset- Diamond Tetris shifted one block in two different directions
need example 1axis and 2axis offsets, and why/when would one prefer one or the other?
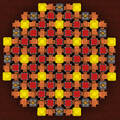
Diamond tetris - connecter centered.
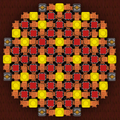
Inverse Diamond tetris - pellet centered.


Layer Types 2-D: A basic layer composed of one of the above patterns
3-D: Uses a special pattern of 6-way connectors and packers that connect to 2-D layers above, below, or both at the same time. When the 3-D layer is sandwiched between two 2-D layers, that is called a 3-D sandwich. When a 2d layer is sandwiched between two 3-D layers, that is called a 2-D sandwich. When the layers alternate between 3-D and 2-D patterns, that is called Alternating Tetris
Connection Layer: Connects the pillars of 6-way connectors in a 2-D or 3-D layer. Advanced Connection layers will closely resemble a 3-D layer. These layers can be placed at any position, though it's best to place them closest to the firing piece.